
To touch up car paint, follow these steps: Clean the area, sand the damaged paint, apply primer, fill in the paint, and finish with clear coat.
Credit: www.thedrive.com
Table of Contents
Reasons For Car Paint Damage
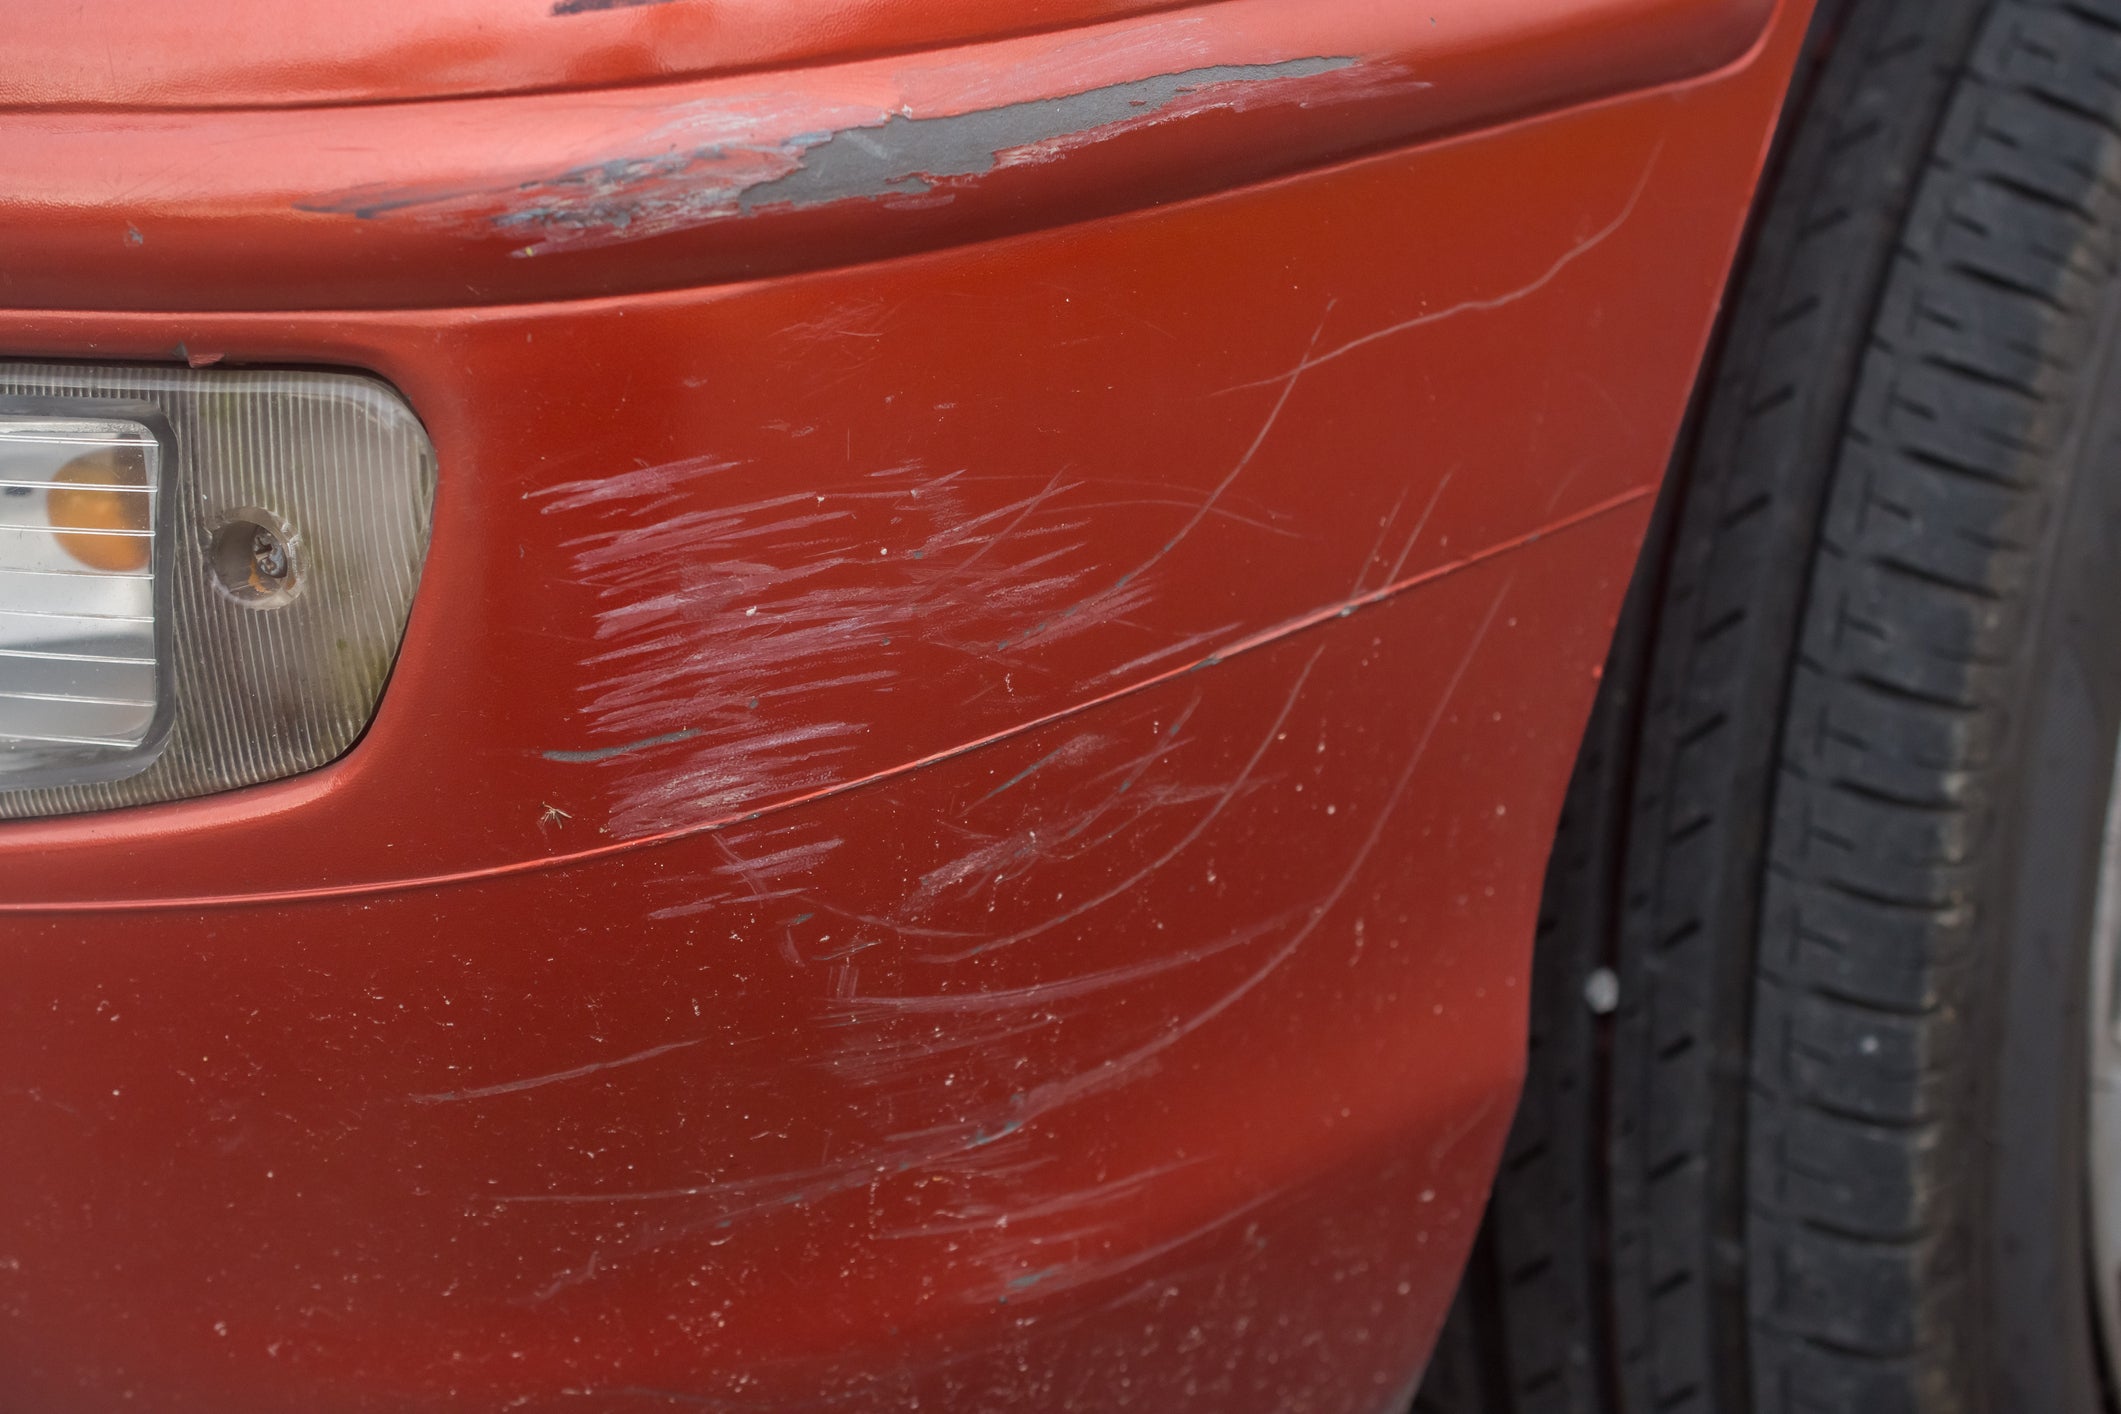
Car paint damage can occur for several reasons, such as scratches, dings, or exposure to harsh weather conditions. Learning how to touch up car paint can help restore its appearance and prevent further damage.
Car paint damage can occur due to a variety of factors. Whether it’s natural wear and tear, accidental scratches and chips, or environmental factors, understanding the causes of paint damage can help you take necessary steps to maintain the pristine appearance of your car.
Natural Wear And Tear:
- UV rays: Prolonged exposure to sunlight can fade and deteriorate car paint, making it appear dull and lackluster. The harmful ultraviolet (UV) rays break down the molecular structure of paint, leading to discoloration.
- Oxidization: Over time, the paint’s protective layer can wear off, making it susceptible to oxidization. This process causes the paint to lose its shine and develop a chalky appearance.
- Abrasion: Regular use and constant exposure to elements like wind, dust, and debris can cause gradual abrasion on the car’s surface, leading to paint deterioration.
Accidental Scratches And Chips:
- Key scratches: Unfortunate encounters with keys or sharp objects can leave unsightly scratches on your car’s paintwork. These scratches can take away from the overall aesthetics and decrease the value of your car.
- Minor impact: Accidental bumping or scraping against objects can result in small chips and scratches. Even a minor impact can cause noticeable damage to the paint surface.
Environmental Factors:
- Bird droppings: Yes, you read that right! Bird droppings contain chemicals that can corrode and damage the paint if left unattended for too long. It is essential to clean them off as soon as possible.
- Road debris: Stones, gravel, and other debris on the road can be unintentionally flung towards your car, resulting in paint chips and scratches.
- Harsh weather conditions: Extreme weather conditions like hail, snow, and heavy rainfall can cause significant damage to your car’s paint. The impact of hailstones or the corrosive effects of salt used to thaw icy roads can leave your car with noticeable blemishes.
Understanding the reasons for car paint damage can help you take proactive measures to protect and maintain your vehicle’s appearance. From providing regular maintenance to promptly addressing minor scratches, you can ensure that your car paint stays in optimal condition for years to come.
Assessing The Damage
Assessing the damage on your car’s paint? Discover the secrets to touching it up effortlessly with expert tips and techniques for a flawless finish.
Imagine you’ve just parked your car in a crowded parking lot, only to find a nasty scratch on the side of your beloved vehicle. It’s disheartening, to say the least. But before you panic, take a deep breath and assess the damage.
In this section, we’ll guide you through the crucial steps to evaluate the extent of the damage and determine the type of paint needed to touch it up.
Clean The Area
Before you can accurately assess the damage, it’s essential to clean the affected area thoroughly. Use a mild car soap and water solution to remove any dirt, debris, or wax residue that might be hiding the true extent of the damage.
Make sure to dry the area completely before proceeding to the next step.
Evaluate The Extent Of The Damage
Now that the area is clean, it’s time to closely inspect the damage. Here are a few key points to keep in mind:
- Examine the scratch or chip from different angles and lighting conditions to get a comprehensive understanding of its depth and width.
- Determine if the damage has affected only the clear coat, the base coat, or has gone all the way through to the metal.
- Assess the length and width of the affected area to determine the size of the touch-up job required.
- Pay attention to any surrounding damage, such as paint transfer or adjacent scratches, which could influence the touch-up process.
By carefully evaluating the extent of the damage, you’ll be better equipped to address the issue effectively.
Determine The Type Of Paint
To achieve a seamless touch-up, it’s crucial to identify the exact type of paint used on your car. Here’s how you can determine the paint type:
- Check your car’s owner’s manual for information on the specific paint code or color name.
- Look for a paint code sticker on the car’s door jamb, engine bay, or trunk compartment.
- If you can’t find the code, consult your car manufacturer’s website or contact their customer service for assistance.
- In some cases, professional help from an automotive paint specialist may be necessary to accurately match the paint color.
Identifying the correct paint type is essential to ensure a near-perfect touch-up that seamlessly blends with the surrounding paintwork.
In the next section, we’ll delve into the step-by-step process of preparing and executing a car paint touch-up. Stay tuned!
Preparing For Touch-Up
Preparing for touch-up is an essential step in maintaining your car’s paint. Follow these tips to ensure a seamless touch-up process and keep your car looking flawless.
Gather The Necessary Tools And Materials:
To prepare for touch-up work on your car’s paint, it is important to gather the necessary tools and materials. Here are the essentials you will need:
- Fine-grit sandpaper: Use sandpaper with a grit between 800 and 1500 to smooth out the surface before touching up the paint.
- Tack cloth: A tack cloth helps remove any dust and debris from the car’s surface after sanding.
- Primer: Primer prepares the surface for paint and helps it adhere better. Make sure to choose a primer suitable for automotive use.
- Touch-up paint: The touch-up paint should match your car’s original color. Obtain the correct color code, which is usually found on the vehicle identification plate.
- Mixing supplies: You may require mixing cups and stir sticks if your touch-up paint needs to be prepared before use.
- Clean cloth or microfiber towel: Use a clean cloth or microfiber towel to apply the paint and remove any excess.
- Paint applicator: Depending on the size of the area you are touching up, you can use a small foam brush, a touch-up pen, or a fine-tip paintbrush.
Choose The Right Paint Color:
Selecting the correct paint color is crucial for achieving a seamless touch-up job. Follow these guidelines when choosing the right paint color:
- Color code verification: Ensure that you have the accurate color code for your car’s paint. Refer to the vehicle identification plate or consult your car’s manufacturer for assistance.
- Sunlight comparison: Take the paint sample or color chart outside in natural sunlight to compare it with your car’s color. This will help you match the shade accurately.
- Paint compatibility: Confirm that the touch-up paint you are purchasing is compatible with the type of paint used on your car. This information is usually mentioned on the paint can or label.
Remember, choosing the wrong paint color can result in an obvious and unsightly touch-up job. Take your time and ensure an exact match.
Ensure Proper Ventilation And Safety Precautions:
Before beginning any car paint touch-up work, there are important ventilation and safety precautions to keep in mind:
- Outdoor work area: It is ideal to perform touch-up work in a well-ventilated outdoor area to prevent fume buildup and to ensure proper air circulation.
- Personal protective equipment: Wear latex gloves, safety goggles, and a dust mask to protect yourself from potential paint and chemical exposure.
- Adequate clothing protection: Wear old clothes or an apron to prevent any accidental paint splatters or stains on your regular attire.
- Fire safety measures: Keep a fire extinguisher nearby, away from any flammable materials, as a precautionary measure.
By taking the necessary steps to ensure proper ventilation and safety, you can conduct your car paint touch-up with peace of mind, minimizing the risk of any health or safety issues.
Steps For Touching Up Car Paint
Learn how to touch up car paint with these simple steps. From preparing the surface to applying the paint, this guide will help you achieve a flawless finish for your vehicle.
When your car’s paint gets chipped or scratched, it can be frustrating. Luckily, touch-up paint can help you fix these imperfections and restore your car’s appearance. Follow these simple steps to touch up car paint and achieve professional-looking results:
Clean And Prep The Damaged Area:
- Thoroughly clean the damaged area using a mild car detergent and a soft cloth.
- Rinse the area with water and allow it to dry completely.
- Remove any loose paint chips or debris using a clean, lint-free cloth or sandpaper.
Apply Primer If Necessary:
- If the damaged area is down to the bare metal or plastic, it is essential to apply a primer before the touch-up paint.
- Use a primer that is compatible with your car’s paint color.
- Apply a thin and even coat of primer to the damaged area, following the manufacturer’s instructions.
Apply Thin Layers Of Touch-Up Paint:
- Shake the touch-up paint bottle well to ensure proper mixing of the color.
- Dab the paint onto the damaged area using the applicator brush or a fine-tip paintbrush.
- Apply thin layers of paint, allowing each layer to dry before applying the next.
- Repeat this process until the damaged area is covered and the color matches seamlessly.
Allow Proper Drying Time:
- Allow the final layer of touch-up paint to dry for the recommended amount of time. This typically takes a few hours, but refer to the instructions on the paint bottle for specific drying times.
- Avoid touching or disturbing the painted area during the drying process to ensure a smooth finish.
Finish With Clear Coat For A Seamless Blend:
- To achieve a flawless and long-lasting finish, apply a clear coat over the touch-up paint.
- Clear coat provides additional protection and helps blend the repaired area with the rest of the car’s paintwork.
- Apply the clear coat in thin layers, allowing each layer to dry before applying the next.
- Follow the manufacturer’s instructions for drying time.
By following these steps, you can easily touch up your car’s paint and restore its original beauty. Remember to take your time, apply thin coats, and allow proper drying to achieve professional-looking results.
Tips For A Flawless Touch-Up
Get that perfect touch-up for your car paint with these expert tips. Discover the secrets to flawless touch-ups and keep your vehicle looking its best.
Touching up car paint can be a daunting task, but with the right techniques, you can achieve a flawless finish. Whether you’re dealing with minor scratches or chips, these tips will guide you through the process and help you achieve professional-looking results.
Use The Right Applicator
- Choose a fine-tipped paintbrush or a paint pen that matches the size of the area you’re touching up. This will allow for precise application and minimize the risk of overpainting.
- Alternatively, for larger areas, consider using an airbrush or spray can for an even and seamless coverage.
- Ensure that the applicator is clean and free from any debris or old paint remnants to prevent contaminating the touch-up paint.
Apply Multiple Thin Coats
- Instead of trying to cover the damage with one thick coat, apply multiple thin coats of touch-up paint.
- Allow each coat to dry completely before applying the next one. This will help build up an even coverage and blend the touch-up paint with the existing paint more effectively.
- Be patient and resist the temptation to rush the process by applying thick coats. Thin coats will ensure a better adhesion and a more seamless result.
Blend The Touch-Up Paint With The Existing Paint
- To achieve a flawless touch-up, it’s crucial to blend the touch-up paint with the surrounding paint.
- Use light feathering strokes to apply the touch-up paint, gradually extending beyond the damaged area. This will help create a smooth transition between the touch-up paint and the existing paint.
- Remember to closely match the color and finish of the touch-up paint to the existing paint for a seamless blend.
Take Your Time And Be Patient
- Touching up car paint requires careful attention to detail, so take your time and be patient throughout the process.
- Rushing through the application can lead to mistakes and an inconsistent finish.
- Carefully follow the manufacturer’s instructions for drying times, curing times, and any other recommended steps to ensure the best possible results.
Buff And Polish For A Smooth Finish
- Once the touch-up paint has dried and cured, it’s time to buff and polish the repaired area for a smooth finish.
- Use a fine-grit sandpaper or a rubbing compound to lightly sand the repaired area, blending it with the surrounding paint.
- Follow up with a polish to restore shine and further blend the repaired area with the rest of the car’s paintwork.
- Remember to use gentle pressure and circular motions while buffing to avoid causing any further damage.
By using the right applicator, applying multiple thin coats, blending the touch-up paint, taking your time, and buffing and polishing for a smooth finish, you can achieve professional-quality results when touching up car paint. So, don’t let minor scratches or chips ruin the appearance of your car.
With these tips, you’ll be able to restore its beauty and maintain its allure.
Common Mistakes To Avoid
Learn how to touch up car paint without falling into common mistakes. Follow these 6 guidelines to ensure that your car paint touch-up is flawless and long-lasting. Avoid repetitive terms and keep your sentences brief to maintain reader interest.
When it comes to touching up car paint, there are a few common mistakes that you’ll want to avoid. Taking the time to properly touch up your car’s paint can make a big difference in its appearance and overall value.
So, let’s dive into the common mistakes that you should steer clear of:
- Applying too much paint: One of the biggest mistakes people make when touching up car paint is applying too much paint at once. This can result in a thick, uneven layer that stands out from the rest of the car’s surface. To avoid this, apply thin coats of paint and allow each coat to dry before adding another.
- Rushing the process: Touching up car paint requires patience and attention to detail. Rushing through the process can lead to sloppy results. Take your time to ensure each step is completed correctly, from cleaning and preparing the surface to applying the paint and allowing it to dry properly.
- Neglecting proper drying time: Proper drying time is crucial when touching up car paint. If you don’t allow the paint to fully dry between coats or before exposing it to the elements, it can lead to smudging, uneven color, or even damage to the paint job. Follow the manufacturer’s instructions for drying time, and consider using a fan or heat gun to speed up the process if necessary.
- Forgetting to blend the paint: Blending the touch-up paint with the surrounding area is essential for a seamless finish. Forgetting to blend the paint can result in a noticeable patch or color difference. Use a small brush or sponge to feather the paint outwards from the touched-up area, gradually blending it with the surrounding paint.
- Not protecting the surrounding areas: When touching up car paint, it’s crucial to protect the surrounding areas from overspray or accidental damage. Use masking tape or painter’s tape to cover adjacent panels, trim, and any other areas that you don’t want to get paint on. This will help ensure a clean and professional-looking paint job.
By avoiding these common mistakes, you’ll be well on your way to successfully touching up your car’s paint and achieving a flawless finish. Take your time, follow the correct steps, and your car will be looking as good as new in no time at all!
Maintaining And Protecting Your Touch-Up
Learn how to maintain and protect your car’s touch-up paint with these essential tips. From proper cleaning techniques to using quality products, discover how to keep your car’s paint looking fresh and vibrant for longer.
Regular washing and waxing:
- Wash your car using a gentle car wash solution and a soft sponge. This will help remove dirt and grime without damaging your touch-up paint.
- Apply a layer of high-quality car wax to protect the paint and enhance its appearance. This will also make it easier to clean any future dirt or stains.
Avoiding harsh chemicals and abrasive materials:
- Steer clear of abrasive materials like scrub brushes or rough sponges, as they can scratch the painted surface and damage your touch-up.
- Refrain from using harsh chemicals, such as ammonia-based cleaners or solvents, as they can strip away the protective layer and fade the paint.
Treating scratches promptly:
- Keep an eye out for any new scratches or chips on your car’s exterior. Promptly treating them will prevent further damage and rust formation.
- Use a touch-up paint pen or brush to fill in the scratch, adhering to the manufacturer’s instructions. Allow proper drying time before moving on to the next step.
Touching up any new damage quickly:
- Regularly inspect your car for any newly acquired dents or scratches. The sooner you address these issues, the easier it will be to touch them up.
- Apply touch-up paint in thin layers, gradually building up the paint to match the surrounding area. Allow each layer to dry before adding another.
Seeking professional help for extensive damage:
- If you notice extensive damage or deep scratches that are beyond your expertise, it’s best to consult a professional.
- An experienced auto body shop can provide the necessary repair work, ensuring a seamless touch-up job that blends in with the original paint.
Remember, keeping your touch-up paint well-maintained and protected is vital for long-lasting results. By following these guidelines, you can preserve the beauty and integrity of your car’s paint for years to come.
Frequently Asked Questions Of How To Touch Up Car Paint
How Do You Touch Up Car Paint?
To touch up car paint, start by thoroughly cleaning the area to remove any dirt or debris. Then, use touch-up paint that matches your car’s color and apply it carefully using a small brush or a paint pen. Allow the paint to dry fully before applying any clear coat or wax for a seamless finish.
Can I Touch Up Car Paint Myself?
Yes, you can touch up car paint yourself. Start by cleaning the area, sanding down any rough edges, and applying touch-up paint with a small brush or paint pen. Take your time and be careful to match the color as closely as possible.
With patience and attention to detail, you can achieve professional-looking results.
How Long Does Touch Up Car Paint Last?
The longevity of touch-up car paint can vary depending on factors such as the quality of the paint used, application technique, and exposure to sunlight and weather conditions. On average, touch-up paint can last for several years if applied correctly and maintained properly.
Regular washing, waxing, and protecting the area from harsh elements can help prolong its lifespan.
Conclusion
Taking care of your car’s paint job is essential for keeping it looking its best. By following these simple steps, you can easily touch up any small scratches or chips in your car’s paint. Start by cleaning the area and removing any dirt or debris.
Then, use a touch-up paint pen or brush to carefully fill in the damaged area. Allow the paint to dry thoroughly before applying a clear coat to protect the touch-up. Remember to blend the touch-up paint with the surrounding area for a seamless finish.
Regularly waxing and washing your car can help maintain its paint job’s longevity. By taking the time to touch up your car’s paint, you can keep it looking like new for years to come. So, don’t neglect those small imperfections and give your car the love it deserves!