To remove a dealer sticker from your car, use a hairdryer to heat the sticker and slowly peel it off. When you buy a new car, it’s common to find a dealer sticker on the back or side windows.
While some people may like to leave it as it is, others prefer to remove it for a cleaner look. However, removing the sticker can be a bit tricky if you don’t do it properly. To avoid damaging your car’s paint, it’s important to follow the right method.
We will guide you on how to remove a dealer sticker from your car without leaving any residue or scratches. So let’s get started!
Table of Contents
- 1 Reasons To Remove Dealer Sticker
- 2 Potential Issues With Removing Dealer Sticker
- 3 Checklist Before Starting
- 4 Essential Tools For Removing Dealer Sticker
- 5 Optional Tools For A Smoother Removal Process
- 6 Method 1: Heat And Peel
- 7 Method 2: Adhesive Remover
- 8 Method 3: Razor Blade Technique
- 9 Tips For A Successful Sticker Removal
- 10 Precautions To Avoid Damage
- 11 Recap Of Methods And Tips
- 12 Final Thoughts
- 13 Conclusion
Reasons To Remove Dealer Sticker
Removing dealer stickers from your car is a personal preference that comes down to aesthetics and resale value. Many car owners choose to remove these stickers to enhance the overall look of their vehicles. Having a clean, sticker-free surface can give a more polished and professional appearance.
Additionally, removing the dealer sticker can help increase the resale value of the car. Prospective buyers often prefer a car with a clean exterior that doesn’t have any visible signs of previous ownership. By removing the dealer sticker, you can improve the resale value and make your car more appealing to potential buyers.
Ultimately, the decision to remove the dealer sticker is up to you and what you believe will enhance your car’s appearance and value.
Potential Issues With Removing Dealer Sticker
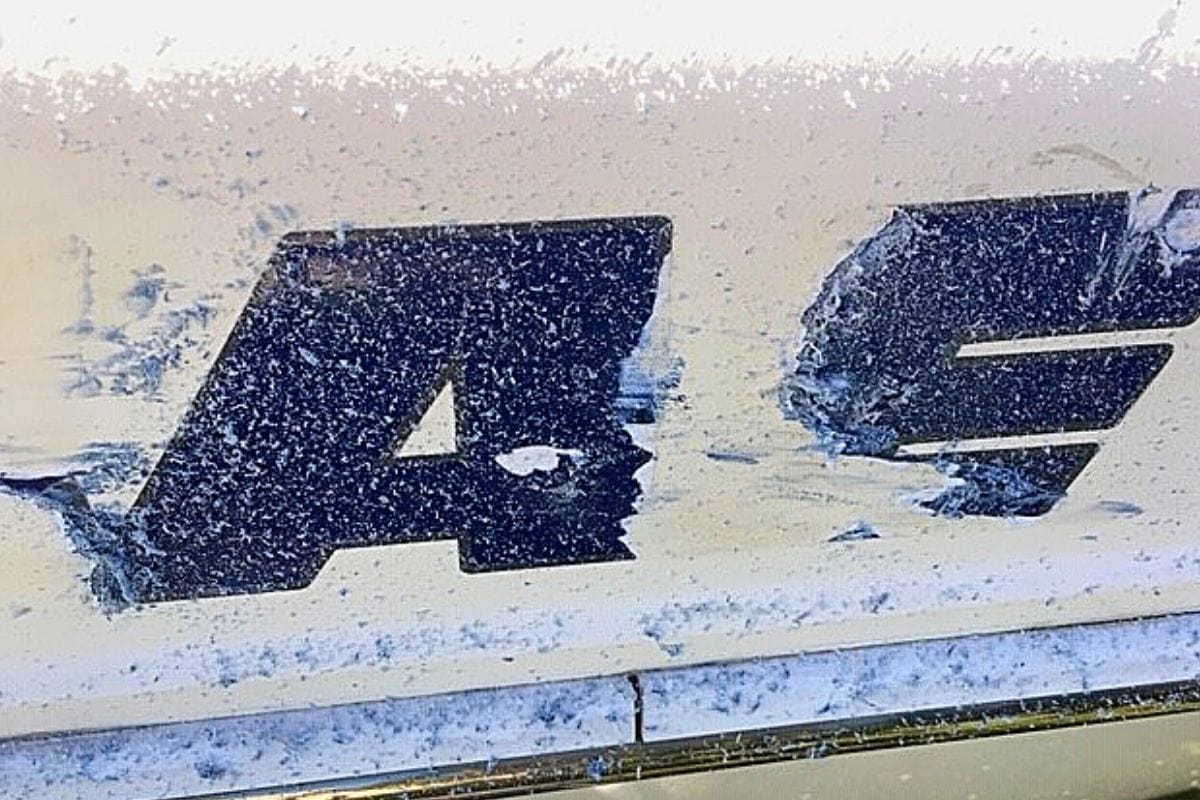
While removing a dealer sticker from your car, there are potential issues to keep in mind. One such issue is leftover residue that may be left behind after removing the sticker. This residue can be sticky and difficult to remove entirely from the car’s surface.
Additionally, there is a risk of scratching the car’s paint if not done carefully. Therefore, it is essential to approach the process with caution and follow the proper steps to prevent any damage. Removing the residue can be achieved using various methods, such as using heat, adhesive removers, or gentle scraping with a plastic card.
By taking necessary precautions and being patient, you can successfully remove the dealer sticker without any problems.
Checklist Before Starting
When removing a dealer sticker from your car, it is important to follow a checklist before starting. One of the first things you should consider are the safety measures involved in this process. Make sure you gather the necessary tools and materials needed for the task.
This will ensure that you have everything on hand and ready to go. Taking the time to prepare will make the sticker removal process much smoother and more efficient. By following these guidelines and taking the necessary precautions, you can remove the dealer sticker from your car without causing any damage or leaving any residue behind.
So, focus on safety and prepare yourself before starting the removal process.
Essential Tools For Removing Dealer Sticker
To remove a dealer sticker from your car, you’ll need a few essential tools. First, grab a razor blade or box cutter to carefully peel off the sticker. Next, use a heat gun or hairdryer to soften the adhesive for easier removal.
If there’s any residue left, apply Goo Gone or an adhesive remover to dissolve it. Once the sticker and residue are gone, use a microfiber cloth to clean the surface. Lastly, use a squeegee or plastic card to smooth out any remaining adhesive.
With these tools on hand, you can effortlessly remove those unwanted dealer stickers from your car, leaving it looking clean and sticker-free.
Optional Tools For A Smoother Removal Process
Removing dealer stickers from your car can be made easier with the help of some optional tools. One tool you can use is a plastic scraper, which can gently lift off the sticker without scratching the surface. Another option is a clay bar, which can effectively remove any residue left behind by the sticker.
It is also important to wear plastic gloves to protect your hands during the removal process. These tools will ensure a smoother and more efficient removal of dealer stickers from your car.
Method 1: Heat And Peel
Removing dealer stickers from cars can be a simple process by using the heat and peel method. To start, prepare the surface by cleaning it thoroughly. Then, heat the sticker using a hairdryer or heat gun, being careful not to damage the paint.
Once the sticker is heated, gently begin peeling it from one corner, applying more heat if necessary. Take your time to ensure the sticker comes off in one piece. Finally, clean any residual adhesive left behind using a mild adhesive remover or rubbing alcohol.
Remember to test any products on a small, inconspicuous area before applying them to the entire surface. With the heat and peel method, you can easily remove dealer stickers from your car without any hassle.
Method 2: Adhesive Remover
Removing dealer stickers from a car can be a daunting task, but using an adhesive remover can make it easier. Before applying the remover, prepare the surface by cleaning it thoroughly. Apply the adhesive remover and let it sit for a few minutes to dissolve the sticker’s adhesive.
Then, using a plastic card or your fingernail, gently peel off the sticker. Be careful not to damage the paintwork. Once the sticker is removed, there may be some residue left behind. To remove it, use a clean cloth and wipe away the residue using circular motions.
Repeat if necessary until the surface is completely clean. Removing dealer stickers from your car is a simple yet effective way to personalize your vehicle.
Method 3: Razor Blade Technique
Removing dealer stickers from your car can be done using the razor blade technique. To start, make sure the surface is prepared. Use a razor blade carefully, peeling the sticker slowly to avoid any damage. Once the sticker is removed, clean any residual adhesive using a suitable adhesive remover or rubbing alcohol.
Remember to be gentle to avoid scratching the surface of your car.
Tips For A Successful Sticker Removal
When removing a dealer sticker from your car, follow these tips for a successful removal. First, work in a well-ventilated area to avoid inhaling fumes. Next, be patient and gentle during the removal process. Start by testing in an inconspicuous area to ensure the method you choose won’t damage the car’s paint.
Precautions To Avoid Damage
When removing a dealer sticker from your car, it is important to take precautions to avoid causing any damage. Excessive heat can be harmful to the paint, so it is crucial to ensure that your car is not exposed to high temperatures.
When using a razor blade to remove the sticker, make sure to be careful and apply only gentle pressure. This will help prevent any scratches or marks on the car’s surface. By following these simple guidelines, you can successfully remove the dealer sticker from your car without causing any harm.
Recap Of Methods And Tips
When removing a dealer sticker from your car, it is important to follow safety precautions. First, gather the necessary tools such as a hairdryer, plastic scraper, adhesive remover, and a microfiber cloth. The three methods commonly used are the heat method, the adhesive remover method, and the WD-40 method.
The heat method involves using a hairdryer to heat the sticker and then slowly peeling it off. The adhesive remover method requires applying an adhesive remover to soften the sticker’s adhesive and then gently removing it. The WD-40 method involves spraying WD-40 on the sticker, letting it sit for a few minutes, and then easily peeling it off.
Regardless of the method, always be cautious and avoid scratching the car’s paint. Take your time and remove the sticker with care to ensure a clean and damage-free finish.
Final Thoughts
Car owners often find themselves wondering how to effectively remove dealer stickers from their vehicles. These stickers are typically placed on the car to advertise the dealership’s name. However, they can be unsightly and may not fit with the overall aesthetics of the vehicle.
Personalization and aesthetics are of utmost importance to car owners who want their vehicles to reflect their own individual style and preferences. Removing the dealer sticker requires careful attention and the right techniques to avoid damaging the vehicle’s paint. One effective method is to use a heat gun or hairdryer to warm the sticker, making it easier to peel off.
Gently scrape off any residue using a plastic card or your fingernail. Finally, use a specialized adhesive remover to wipe away any remaining sticky residue. By following these steps, car owners can easily remove dealer stickers and achieve a clean, personalized look for their vehicles.
Credit: www.methodracewheels.com
Conclusion
To conclude, removing dealer stickers from your car can be a simple and effective process when done correctly. By following the steps outlined in this blog post, you can effectively remove any unwanted stickers without causing damage to your vehicle.
Remember to use a heat gun or hairdryer to loosen the adhesive, and a plastic card or scraper to gently lift the sticker off the surface. Once the sticker is removed, use a mild adhesive remover and a microfiber cloth to clean any residue left behind.
Taking the time to remove dealer stickers can not only improve the appearance of your car but also increase its resale value. So don’t hesitate to take action and give your car a clean and professional look.